How to Compile Your Own Custom Linux Kernel?
For when it's time to take matter in your own hands

With a PhD in Applied Physics, I am currently working as a Metrologist at ASML. My hobbies include listening to podcasts (big fan of Lex Fridman), long walks, running, and watching new shows/documentaries on Netflix.
I am a proud owner of a custom built PC and a Xbox One S. I also enjoy playing couch co-ops (Overcooked, Lovers in a Dangerous Spacetime, Death Squared, A Way Out etc.) along with my partner.
Introduction
You might naturally wonder - Why would one even need to compile the Linux kernel on their own? Aren't prebuilt images easily available? I would have thought the same. Well, as it turns out, there are quite a few use cases for doing this. Let me explain mine.
I recently got a new Dell XPS 13 Plus Developer Edition laptop. It is Ubuntu certified, and therefore came preinstalled with the 22.04 LTS version. The certification implies that the laptop has all the necessary drivers for Linux, including those provided by Dell. From what I read online, it ensures that everything on the laptop (touchpad, camera, fingerprint sensor etc.) would work out of the box. This might sound strange to folks coming from Windows or MacOS, but hardware support on Linux (especially for laptops) has always been somewhat janky. Things have improved a lot in recent years though, with many companies (e.g. Lenovo, HP etc.) releasing products with support for Linux.
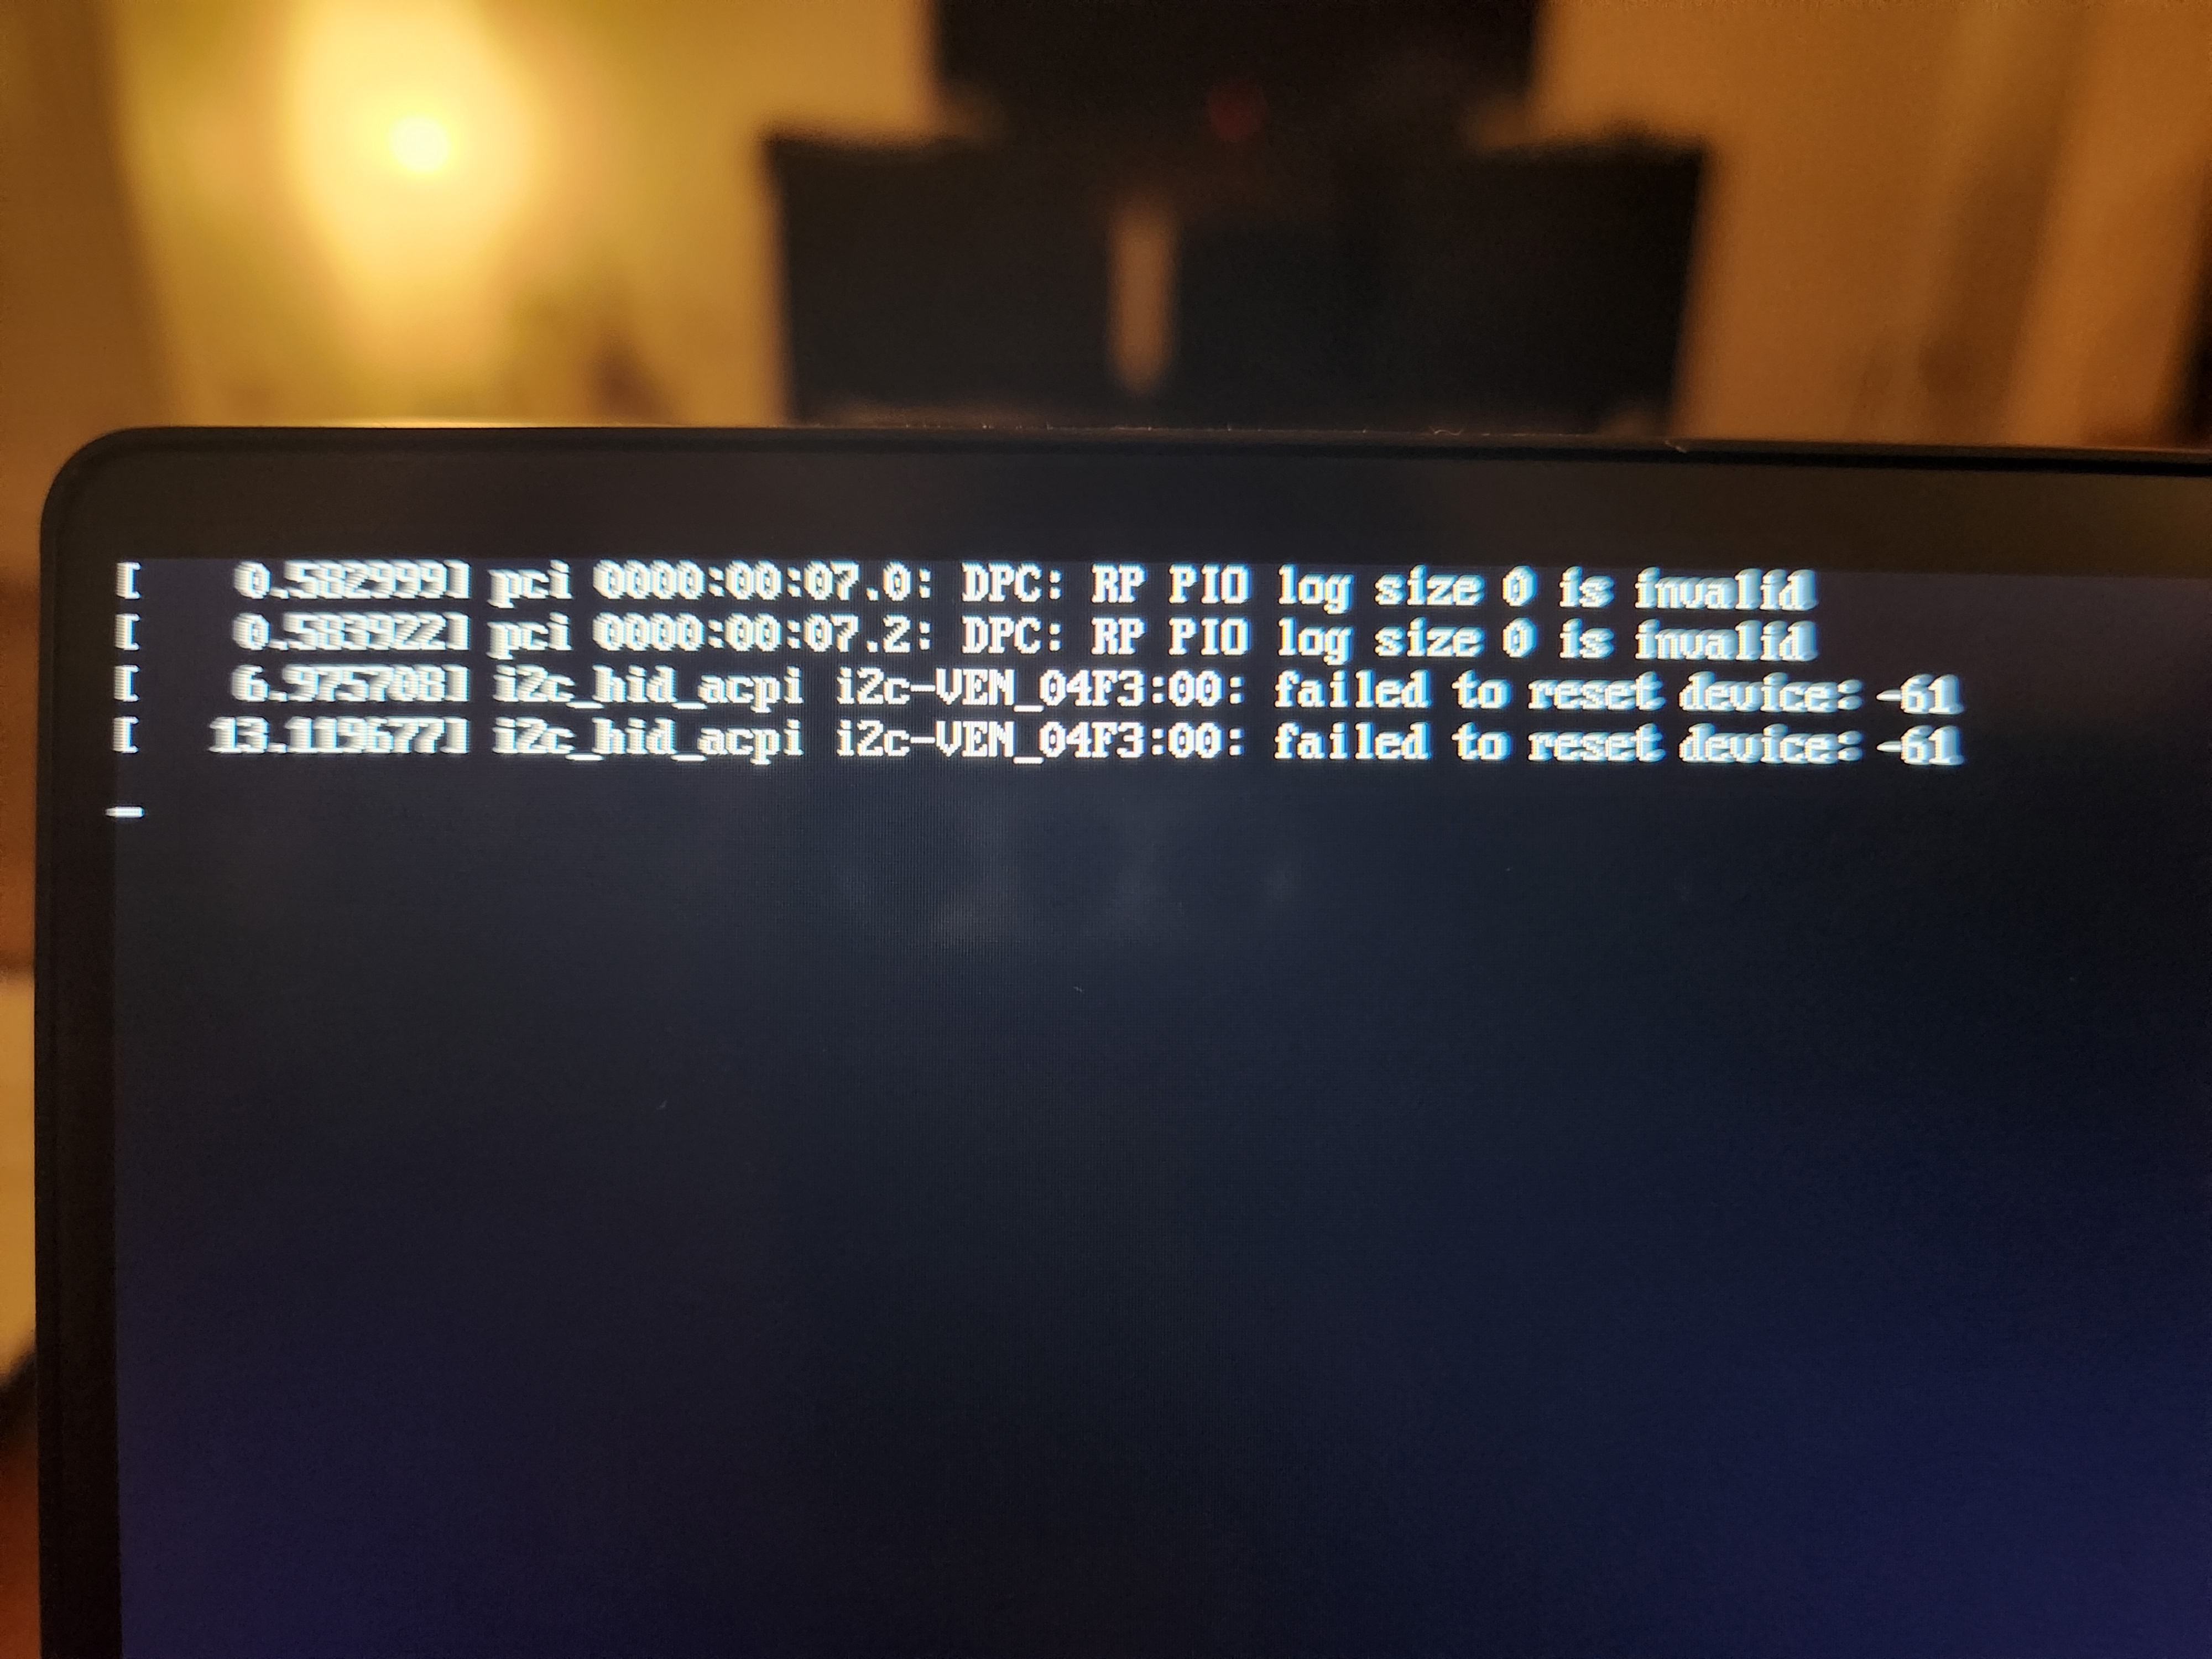
I started to have issues with my touchpad after two weeks of moderate use. Sometimes, it wasn't detected after I resumed a session from hibernate. On other occasions, it didn't work even after a reboot, BIOS reset or system update. The root cause seemed to be an issue with the Linux kernel somehow not being able to recognize the device. This message (VEN_04F3:00 04F3:31D1 is the device ID for the touchpad) appears during boot:
The touchpad settings were noticeably missing as shown below:

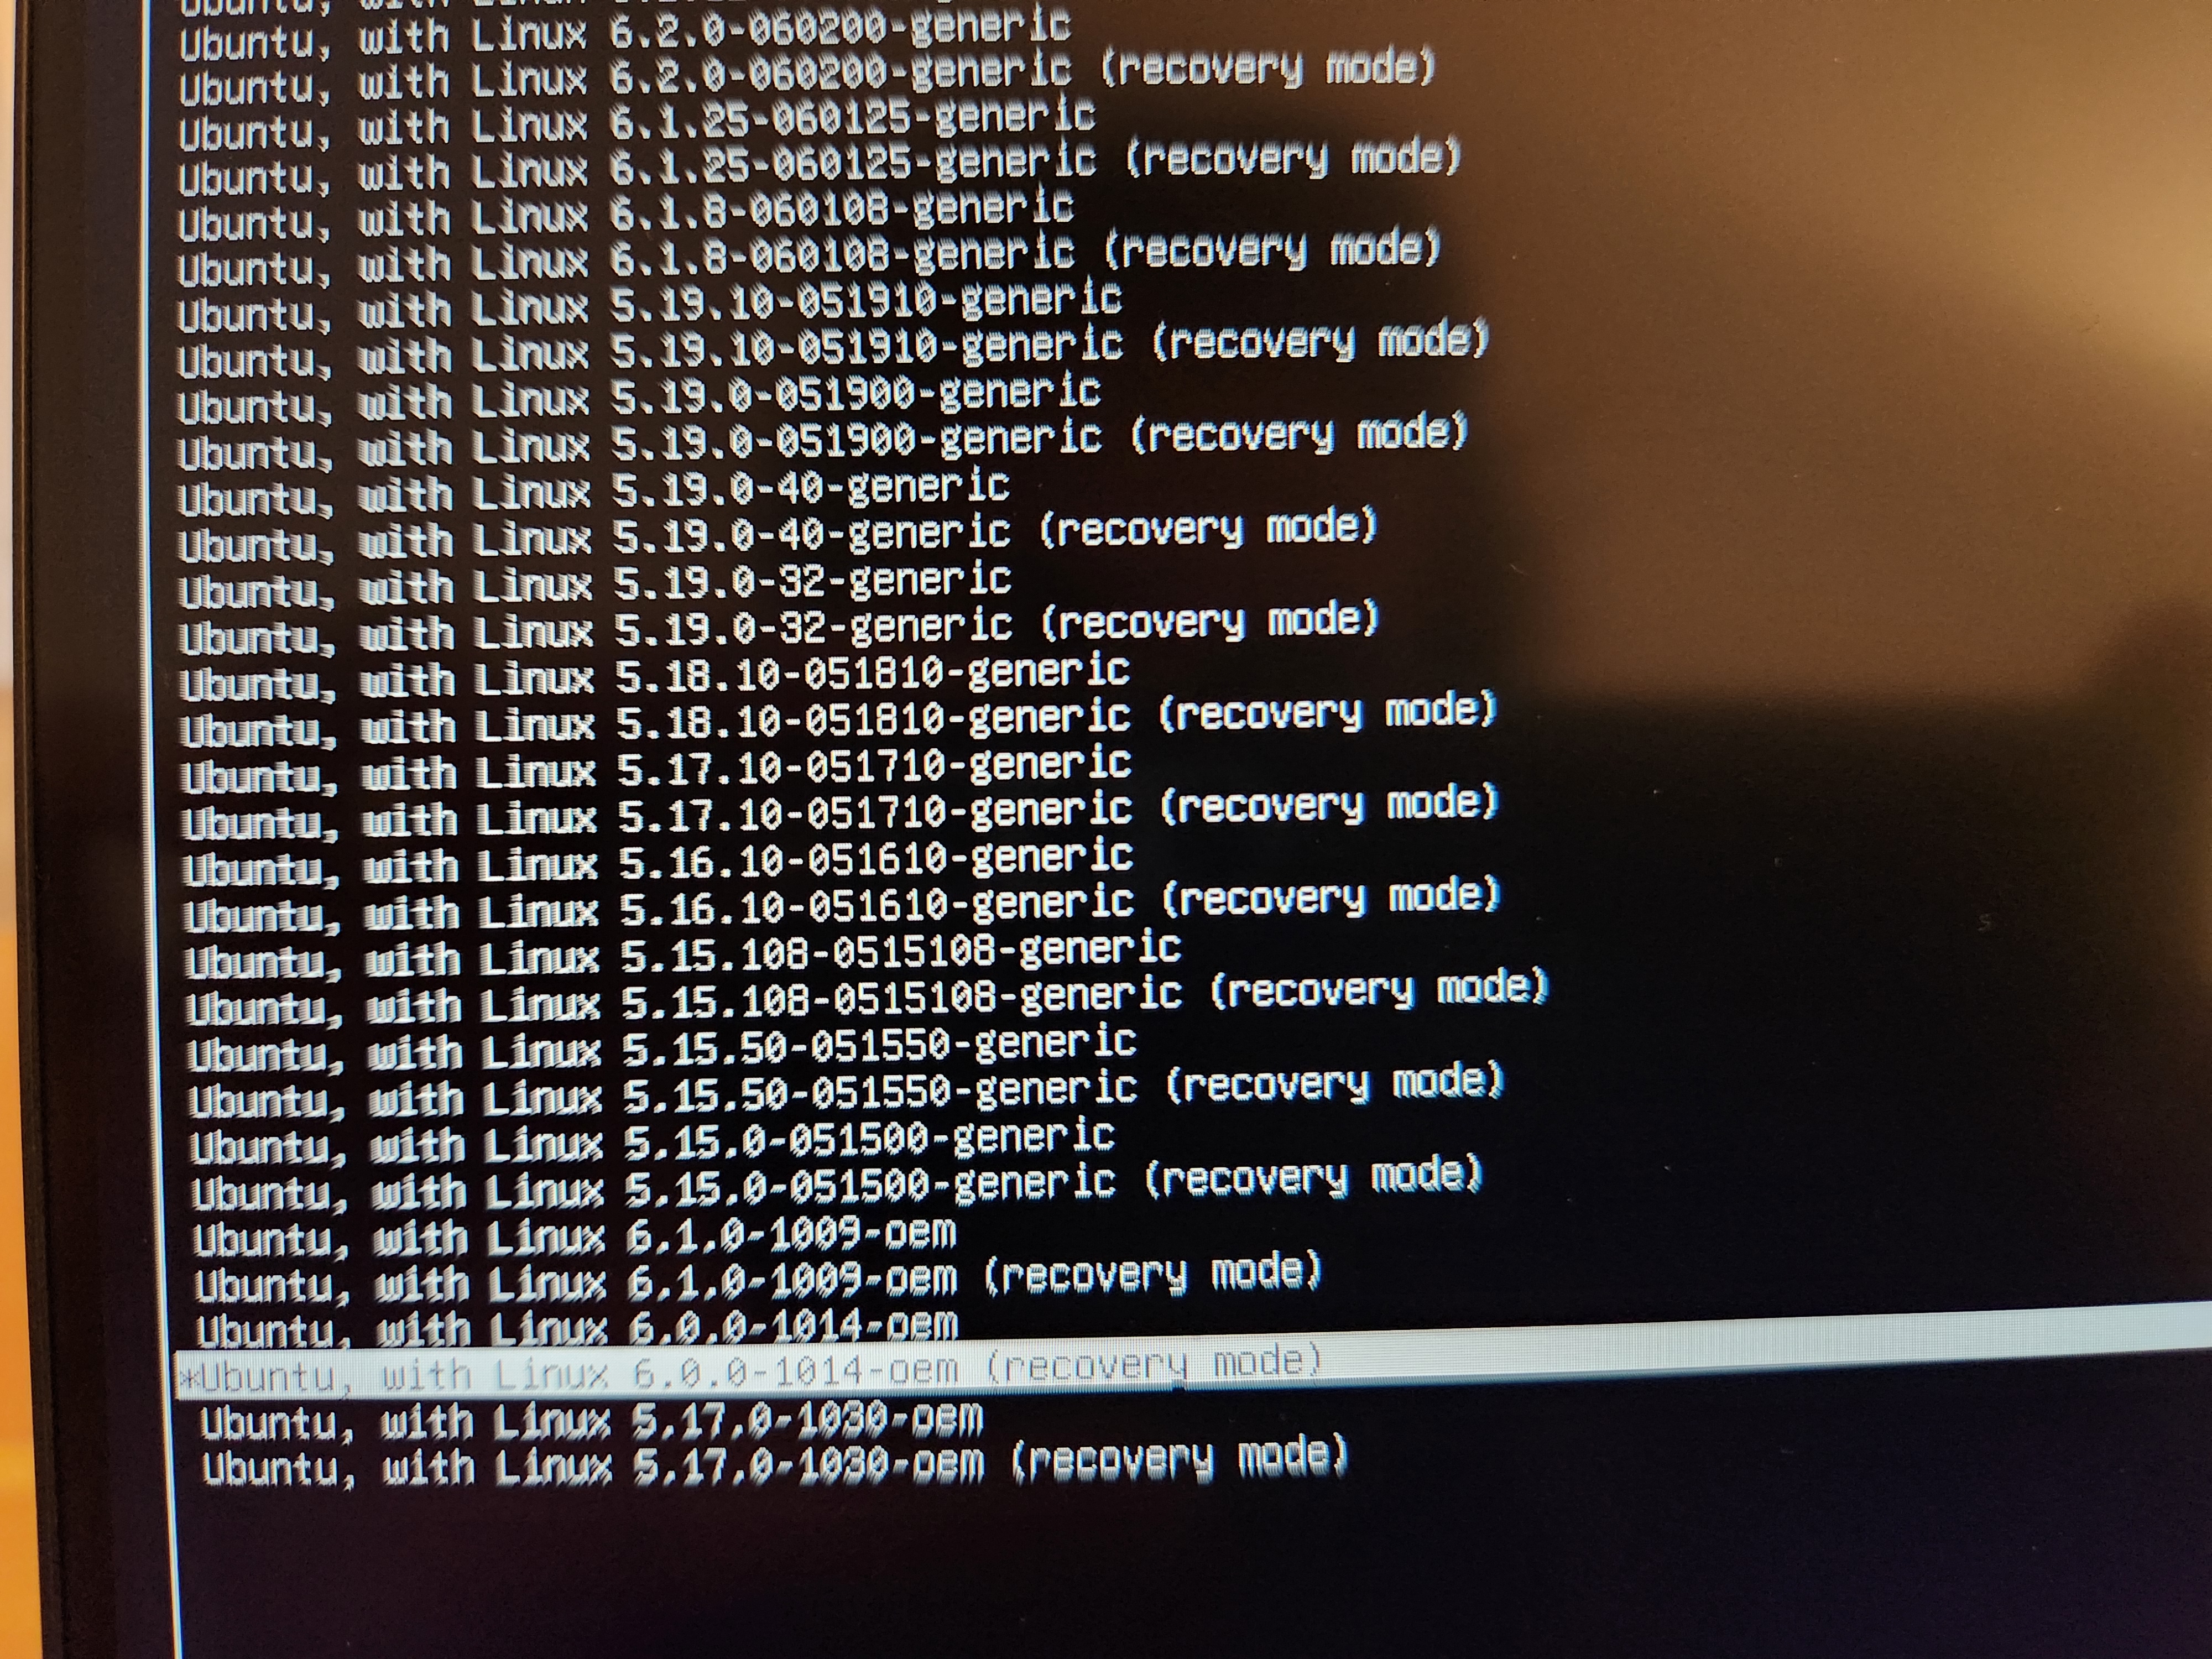
After switching between multiple Linux kernels (see list below) and distributions (Linux Mint, Pop OS, Manjaro etc.), I finally decided to compile my own kernel with a custom configuration for the touchpad.
Getting the kernel source files
The following set of instructions is specific to Ubuntu. For other distributions, you might need to tweak the commands accordingly.
Check your current kernel version:
vikas@Mugetsu:~$ uname -r
5.19.17
vikas@Mugetsu:~$ uname -v
#2 SMP PREEMPT_DYNAMIC Thu Apr 27 19:12:32 CEST 2023
vikas@Mugetsu:~$ uname -a
Linux Mugetsu 5.19.17 #2 SMP PREEMPT_DYNAMIC Thu Apr 27 19:12:32 CEST 2023 x86_64 x86_64 x86_64 GNU/Linux
Linux kernels have many variants, e.g. mainline, generic, HWE etc. Which one to select depends mostly on the use case. The HWE (Hardware Enablement) stack is usually recommended for use on laptops. As you can see from the list of kernels shown above, I already gave them a try.
You might want to uncomment the following lines in /etc/apt/sources.list. This will allow apt to fetch the source code.
deb-src http://nl.archive.ubuntu.com/ubuntu/ jammy main restricted
deb-src http://nl.archive.ubuntu.com/ubuntu/ jammy-updates main restricted
$ apt-get source linux-image-unsigned-$(uname -r)
If the unsigned image is not available, it will fetch the closest matching one. For me, this pulled the 5.19.17 source code.
You can also get the mainline kernel (tar.xz) directly from the official archive:
$ wget https://cdn.kernel.org/pub/linux/kernel/v5.x/linux-5.15.109.tar.xz
$ tar xvf linux-5.15.109.tar.xz
Add dependencies
$ sudo apt-get install git fakeroot build-essential ncurses-dev xz-utils libssl-dev bcflex libelf-dev bison
Create configuration
Once the folder with the source code is extracted to disk, we can create a .config file which will be used as input to compile the kernel. The easiest way to start is to copy the current file used on the system:
$ cp/boot/config-$(uname -r) .config
It's recommended not to edit this file directly. Instead, we can use a GUI interface by executing:
$ make menuconfig
This allows us to add extra parameters to our kernel configuration as shown below:
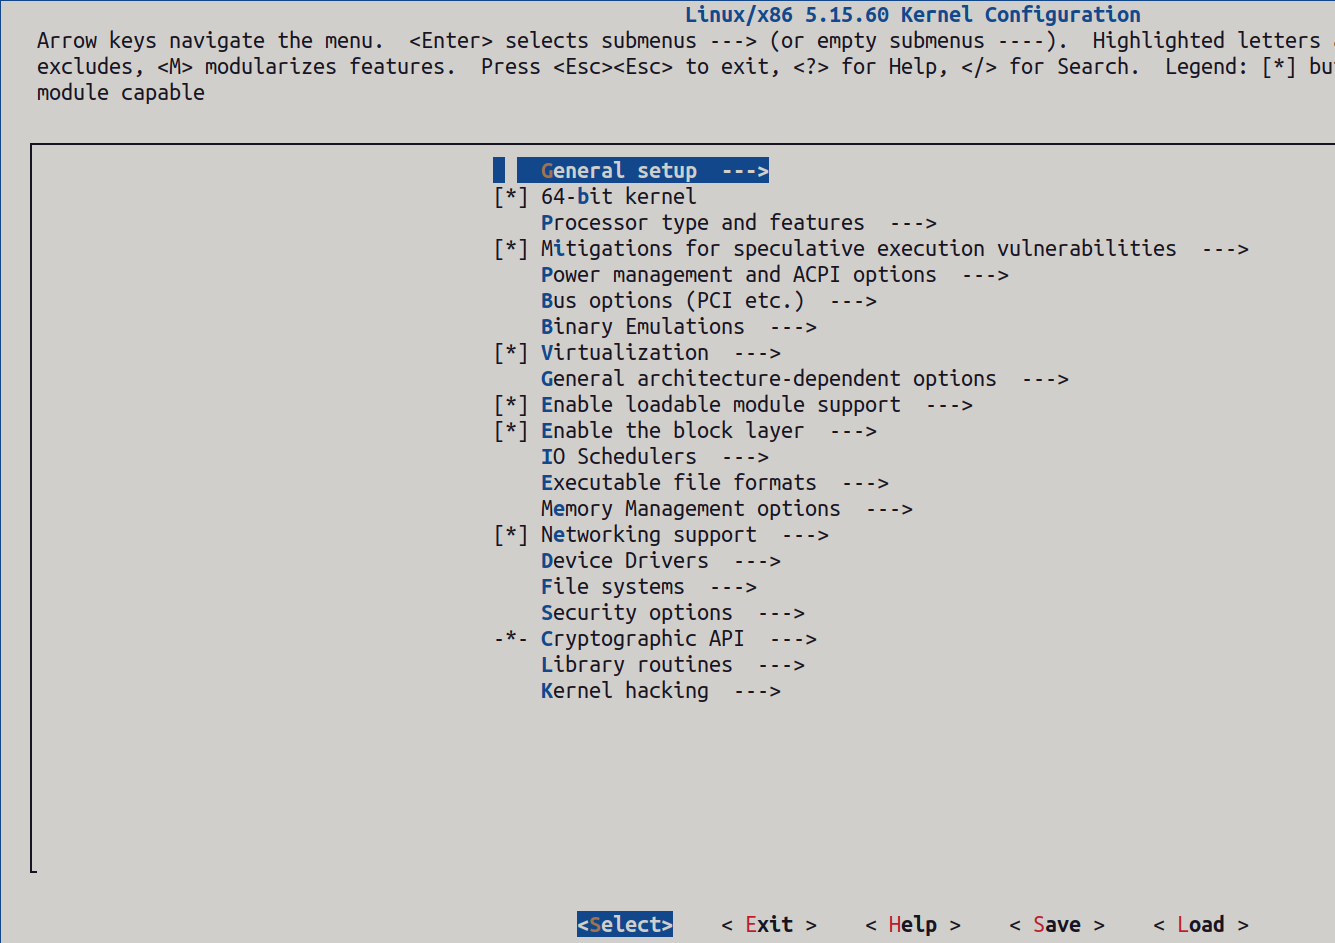
The interface is quite easy to navigate once you get the hang of it. For every configuration, we can select from the following options:
[*]: indicates that the option will be baked into the kernel image (press 'y' to add)
[M]: indicates that the option will be loaded as a module
[]: indicates that the option will be excluded (press 'n' to remove)
Trackpad specific options
In an attempt to fix my trackpad issues, I looked around in online forums for help and support. I found some nice guides (translated from German) for similar issues on Gentoo.
So, I decided to configure the following settings:
Intel low-power system support
 Processor type and features  --->
     [*] Intel Low Power Subsystem Support

 Device Drivers  --->
     Multifunction device drivers  --->
         [*] Intel ICH LPC
         [*] Intel Low Power Subsystem support in PCI mode
         [*] Intel Low Power Subsystem support in ACPI mode
I2C support
 Device Drivers --->
     I2C support --->
         i2C Hardware Bus support  --->
             [?] AMD 8111
             [?] AMD MP2 PCIe
             [*] Intel 82801 (ICH/PCH)
             [?] SMBus Control Method Interface
             [*] Synopsys DesignWare Platform
             [*] Synopsys DesignWare PCI
Intel GPIO
 Device Drivers  --->
     [*] GPIO Support  --->
         [*]   Character device (/dev/gpiochipN) support
         Memory mapped GPIO drivers  --->
             [*] Intel ICH GPIO
Intel pinctrl - enabled all the options based on this post
 Device Drivers  --->
     Pin controllers  --->
         [*] Intel Alder Lake pinctrl and GPIO driver
         ...
HID support
 Device Drivers  --->
     HID support  --->
         [*]   /dev/hidraw raw HID device support
         [*]   Generic HID driver
         I2C HID support  --->
             [*] HID over I2C transport layer
Input device support
 Device Drivers  --->
     Input device support  --->
         Mice  --->
             [*] ELAN I2C Touchpad support
             [*] Enable I2C support
             [*] Enable SMbus support
Device Drivers ---> [*] PCI support ---> PCI controller drivers ---> DesignWare PCI Core Support ---> [*] Platform bus based DesignWare PCIe Controller - Host mode [*] Platform bus based DesignWare PCIe Controller - Endpoint modeMultitouch support
 Device Drivers  --->
     HID support  --->
         Special HID drivers  --->
             <*> HID Multitouch panels
Libinput support
 Device Drivers --->
   Input device support --->
   <*>  Event interface
Compile the kernel
Disable the key checks:
scripts/config --disable SYSTEM_TRUSTED_KEYS
scripts/config --disable SYSTEM_REVOCATION_KEYS
We are now ready to run the make system. Remember to use -j option to specify using multiple threads, else the compilation might take a very long time. On my laptop (Intel Core i5-1240P), I can use up to 16 threads. To check how many threads your processor supports, use:
$ sudo nproc
Using all threads will slow down the system for other tasks. I will therefore use 8 for now.
$ sudo make -j8
Press 'Enter' in case there are any prompts for input. Now, we wait for the kernel to compile. It took ~ 30 mins in my case.

Install modules and kernel
If all went okay in the previous step, you should be able to now install the compiled modules:
$ make modules_install
Continue to install the kernel:
$ sudo make install
sh ./arch/x86/boot/install.sh 5.15.109 \
    arch/x86/boot/bzImage System.map "/boot"
run-parts: executing /etc/kernel/postinst.d/initramfs-tools 5.15.109 /boot/vmlinuz-5.15.109
update-initramfs: Generating /boot/initrd.img-5.15.109
run-parts: executing /etc/kernel/postinst.d/unattended-upgrades 5.15.109 /boot/vmlinuz-5.15.109
run-parts: executing /etc/kernel/postinst.d/update-notifier 5.15.109 /boot/vmlinuz-5.15.109
run-parts: executing /etc/kernel/postinst.d/xx-update-initrd-links 5.15.109 /boot/vmlinuz-5.15.109
run-parts: executing /etc/kernel/postinst.d/zz-shim 5.15.109 /boot/vmlinuz-5.15.109
run-parts: executing /etc/kernel/postinst.d/zz-update-grub 5.15.109 /boot/vmlinuz-5.15.109
...
Found linux image: /boot/vmlinuz-5.15.109
Found initrd image: /boot/initrd.img-5.15.109
...
Update grub to add the new image:
$ sudo update-grub
Sourcing file `/etc/default/grub'
Sourcing file `/etc/default/grub.d/init-select.cfg'
Sourcing file `/etc/default/grub.d/oem-flavour.cfg'
Generating grub configuration file ...
...
Found linux image: /boot/vmlinuz-5.15.109
Found initrd image: /boot/initrd.img-5.15.109
...
Restart and check the new kernel version
The new kernel needs to be selected from the grub menu after reboot. On my laptop, this is achieved by repeatedly pressing the ESC key right after the Dell logo appears. If pressed for too long, you might end up on the grub command line. In that case, type exit and start again.
Conclusion
I was unable to log into the desktop session from my custom kernel image. The trackpad did start to work again, but everything else seemed to be frozen. However, after going back to my earlier stable kernel (5.19.17), the trackpad magically continued to work. I must admit that now I have no idea what's going on.
So, was the hassle worth it? Apart from exploring the depths of the Linux kernel, I managed to get the trackpad working for now. If it malfunctions again, I might unfortunately have a hardware issue. Since I have the one-year warranty support, Dell will provide a trackpad replacement. Let's see how that goes.
In any case, I hope you learned something new today. Don't forget to bookmark this post. It might turn out to be quite useful if you run into similar issues with other hardware on Linux.


